Automation Account Pattern

Context

The service you are developing provides APIs for users. When an user calls an API, (s)he must show a short-living authorization credential, e.g. an OAuth2 token.

The user creates, owns, updates or deletes resources in the service on behalf of the account to which the credential is associated. Here, the `user' might be (an user-agent operated by) a human but also it might be an automated program running in background.

Also you want to use captcha to prevent huge number of accounts from being registered for some fraud purpose.
And you might even want to let users register their billing address for charging.

Problem

It is hard for users to securely manage accounts which automated programs use.

"manage" here basically means to create/update credentials as necessary and handle bills. A human (or a specialized billing-system, at least) must handle these things instead of the automated program because such a program tends to be bad at solving captcha -- it is by design and raison d'être of captcha --, and it is even worse at receiving bills by mail and going to bank to pay.

Then, how can (s)he manage the account for the program? Although some easy solutions come to the mind of the user, they do not work fine enough.

  • Reuse the account of the human for the program

    Individual members in the team which manage the program can leave the team.

    So suppose that the owner of the account leaves the team. Then the resources owned by the person can be deleted, or access to the resources can be restricted. At least, it would get hard to manage authentication credentials of the account.

  • Create an account only for the program

    In this approach, (s)he creates a new account for the program in the same way as (s)he creates an account for human. Then the person lets the program use the new account. This account is shared by the team. So even if someone leaves the team, someone else in the team can manage the account.

    There are, however, some scenarios in which this approach will not work fine. First, members in the team must share the authentication credential, e.g. passwords, to manage the account. But it is hard to track usage of the credential for audit. Second, even though it would get harder to keep the authentication credential secret as the team gets larger and the team needs to update the credential when necessary, it would also get harder to notify the update to all members in the team. Finally, even if they solve the issues above, it still tends to happen that someone in the team creates an account but (s)he leaves the team without sharing the account with others. Then none can manage the account.

    To make things worse, they need to keep the account for the program having the minimum rights for security. It means that they will have more number of accounts per usage and the issues above becomes more serious.

Examples

1. Github - Travis integration

  • System

    github

  • Resource

    private repositories

  • Account

    github account

  • short-living authorization credential

    OAuth2 token issued by github

  • Authentication information to manage the account

    Password of the github account

  • Automated Program

    Build processes running on Travis CI.

2. Cookpad - AWS

  • System

    Amazon Web Services

  • Resource

    S3 bucket

  • Account

    AWS account

  • short-living authorization credential

    AWS access-key

  • Authentication information to manage the account

    AWS password

  • Authomated program

    The feature that allows users of Cookpad to upload their pictures of dishes.

Solution

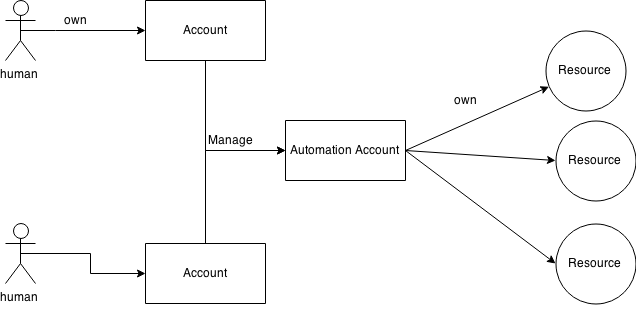
  1. Define another kind of accounts ( Automation Account ), which is only for automated programs.

  2. Distinguish this kind of accounts from ordinal accounts for humans.

  3. Do not assign any passwords to automation accounts. Instead, associate the automation account to a list of human accounts who can manage the automation account.

Humans in the list just need to login to the system with their own human accounts when they manage the automation account. So they don't need to share the password of the automation account. Moreover, the automation account does not need to have its own password.

Diagram of Automation Account

Implementatinos

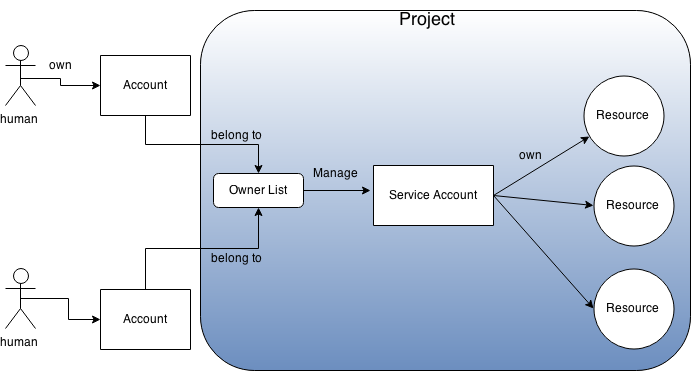
1. Service Accounts in Google Cloud Platform (GCP)

  • Most of resources provided by APIs in GCP belong to a unit called "project".
  • There are two kinds of accounts: ordinal (human) accounts and service accounts

    • User accounts for humans (Gmail accounts or accounts of Google Apps for Work) are independent from projects, and those accounts can join arbitrary number of projects as read-only, writable or owners.
    • On the other hand, service accounts are accounts only for automated programs. A service account uniquely belongs to a project. And when the project is deleted, the service account is also deleted together with other resources in the project.
  • Since service accounts do not have passwords for login, you can not use service accounts when you log into web pages but you can use them only for API calls with their OAuth2 tokens. Also you have to use your own human account and the the account must be an owner of the project when you manage the service account.

  • Billing information is registered per project. Any operations on resources in a project are charged to the billing information of the project.

Diagram of Service Account

2. AWS Identity and Access Management (IAM)

  • Resources provided by APIs in AWS belong to an AWS user account (root account).
  • You can create arbitrary number of IAM accounts under the root account.

    • You can assign an IAM account to human, but also you can assign an IAM account to an automated program without giving any password to the account.
  • You have to use the root account or an IAM account for human when you need to login to the web console to manage IAM accounts.

  • Billing information is registered per root account. Any operations done by IAM accounts are charged to their root accounts.

Diagram of Service Account

Let's compare the two implementations.

The approach of GCP is a bit more complicated for hobby developers because GCP requires the developer to create a "project" in addition to his/her human account even though (s)he is the only developer in the development team. On the other hand, (s)he would be able to do everything just with his/her root accounts in AWS.

Next, let's think about larger development projects. AWS is a bit less secure because root account itself is an account with username and password and the dev team must keep the account secure in addition to their IAM accounts. On the other hand, GCP is secure because it does not have this kind of extra authentication credential which is not usually used.

Automation Accountパターン

コンテキスト

あなたが開発しているサービスはユーザー向けにAPIを提供している。そして、APIを利用するにはユーザーは短寿命の認可情報(たとえばOAuth2トークン)を提示しなければならない。

ユーザーは認可情報が紐付いているアカウントの権限でリソースを読み取ったり、作成したり、所有したり、編集または削除したりする。 ここで、ユーザーは人間(が操作するユーザーエージェント)であることもあるが、人間の手を離れてバックグラウンドで自動実行されるプログラムかもしれない。

また、あなたは悪用目的でアカウントが大量登録されるのを防ぐためにCaptchaを利用したいと思っている。 さらに、課金目的で請求書送付先を登録させたいとも思っているかもしれない。

問題

プログラムが利用するアカウントを安全に管理するのがユーザーにとって困難である。

プログラムは自分でCaptchaを解いたりEメールを受け取るのが苦手だし(そうでないとCaptchaの意味がない)、 また郵便物で請求書を受け取って銀行に振り込みに行くのは更に苦手である。 よって、プログラムが利用するアカウントを作成し、管理し、対応する請求書を処理するのは人間(か、少なくともそれ専用の別のシステム)でなければならない。

ではその人間はどのようにそのプログラムが利用するアカウントを管理すれば良いのか。幾つかの簡単な解決策を思いつくが、いずれも十分とは言えない。

  • 人間のアカウントを使い回す

    プログラムを管理しているチームの誰かのアカウントを使う、という解決法。

    しかし、個々の人間は自動プログラムを管理ししているチームを離れることがある。このアカウントを所有していた人物がいなくなると、 アカウントの元に所有されていたリソースは消滅したり、アクセスが制限されたりする可能性がある。 最低でも、そのアカウントの認可情報を更新するのは困難となる。

  • プログラム専用のアカウントを共有する

    人間用のアカウントを作るのと同様にして、人間がプログラム専用のアカウントを作成する。そしてそのアカウントをプログラムに利用させる、という解決法。 アカウントは自動プログラムを管理する人間たちによって共有されており、たとえ誰かがチームから居なくなっても 他の者がアカウントの管理、認可情報の更新などを行える。

    しかし、これもまた十分とは言えない。人間たちはアカウントを管理するためのパスワードなどの認証情報を共有しなければならないが、 その周知の情報をいつ誰が利用したのか監査記録を付けるのは大きなチームでは難しい。 また大きくなるほど認証情報漏洩のリスクは高まって適時の更新が必要とされるが、大きくなるほど更新したという事実を全員に伝えるのも難しい。 苦労してこれらの問題を解決したところで、誰かが開発用にアカウントを作ったが良いが周知するのを忘れたままチームを去って、結局誰も管理できないアカウントになったりするのもありがちな問題である。

    更に、セキュリティ上はプログラム専用アカウントは最小限の権限を持つのが望ましいが、最小化するために権限ごとにアカウントを設定すると 管理すべきアカウントの数が増えて管理にまつわる問題は酷くなっていく。

具体例

1. Github - Travis連携

  • システム

    github

  • リソース

    プライベートリポジトリ

  • アカウント

    githubアカウント

  • 短寿命認可情報

    githubのOAuth2 token

  • 管理のための認証情報

    githubのパスワード

  • 自動化プログラム

    travisによるビルドプロセス

2. クックパッド - AWS

  • システム

    Amazon Web Services

  • リソース

    S3 bucket

  • アカウント

    AWSアカウント

  • 短寿命認可情報

    AWSアクセスキー

  • 管理のための認証情報

    AWSパスワード

  • 自動化プログラム

    料理の画像をアップロードする機能

解決策

自動化プログラム用のアカウント種別(Automation Account)を作って、人間用のアカウントとは区別する。 また、Automation Accountには管理用のパスワードを割り当てず、代わりに「このAutomation Accountを管理できる人間用アカウントのリスト」を対応させておく。

人間たちは自分自身の人間用アカウントでログインするだけで(リストに載っていれば)Automation Accountを管理できる。 このため、Automation Accountのパスワードを共有する必要はない。 それどころか、プログラム用のアカウントはどうせ人間の誰かが自分のアカウントで管理するのだからAutomation Accountにはパスワードがなくても差し支えない。

Automation Accountの図解

実現例

1. Google Cloud Platform (GCP)のサービスアカウント

GCPAPIが提供するほとんどのリソースは「プロジェクト」という単位に所属する。

ユーザーアカウントはプロジェクトとは独立したアカウント(GmailアカウントまたはGoogle Apps for Workアカウント)で、 任意の数のプロジェクトに読み取り専用、書き込み可、またはオーナーとして参加できる。

これに対してサービスアカウントはプログラム専用のアカウントで、ただ1つのプロジェクトに一意に属し、プロジェクトが削除されると他のリソースと同様サービスアカウントも削除される。

サービスアカウントはログイン用のパスワードを持たないためWebページのログインには利用できず、OAuth2トークンを用いてプログラムからAPIを呼ぶためにしか利用できない。 サービスアカウントを管理するには、そのプロジェクトのオーナーになっている人間のアカウントを利用する。

課金先情報はプロジェクトごとに登録管理される。サービスアカウントであれ一般のユーザーアカウントであれ、プロジェクト内のリソースに対する操作はプロジェクトに対して課金される。

Service Accountの図解

2. AWS Identity and Access Management (IAM)

APIが提供するリソースは特定のAWSユーザーアカウント(rootアカウント)に属する。

権限を分割するために、ユーザーアカウント内に任意個のIAMアカウントを作成できる。 IAMアカウントはパスワードを設定して人間に割り振ることもできるし、パスワードを与えないでおいてプログラムに利用させることもできる。 プログラム用のIAMアカウントを管理するためにwebコンソールにアクセスする場合は、パスワードを割り振られた人間用のIAMアカウントまたはrootアカウントを利用する。

課金情報はrootアカウントごとに登録管理される。IAMアカウントが利用したリソースはその属するrootアカウントに対して課金される。

IAMの図解

2つの実現例を比べてみよう。

GCPのアプローチは一個人が趣味で開発しているような小規模開発においても、開発者のアカウントの他にプロジェクトという単位を作成する必要があるのでやや煩雑である。 一方AWSのアプローチは個人の小規模開発であれば人間用にはIAMアカウントを発行せず、rootアカウントだけですべてを済ませることも可能なので単純である。

大規模な場合に目を移すと、AWSのアプローチはrootアカウントそれ自体がユーザー名とパスワードを持つアカウントであるため、守るべき対象が1つ多い分だけほんの少しセキュアでない。 またそもそもこのrootアカウントのパスワードをどう管理するかという点において上記と類似の問題が残されたままである。 これに対してGCPでは、この通常使われることのない余分な認証情報はそもそも存在しないのでセキュアである。

grpc-gateway更新

先日公開した grpc-gatewayだが、gRPCのメーリングリストで宣伝したらGoogleからフィードバックがあったので対応した。

実はGoogleは社内にgrpc-gatewayに似た仕組みを持っていて、RESTful APIとgRPCの変換にはそれを使っている。 んで、今回Googleはその変換の設定に使っているスキーマhttps://github.com/google/googleapis/tree/master/google/api に公開してくれたのだ。

これを受けてgrpc-gateway独自のカスタムオプションを捨ててGoogleが公開したオプションを使うことにした( grpc-gateway#12 )。これには幾つか理由がある。

  • Googleの長年の経験を踏まえて設計された語彙のほうが、私がとりあえずプロトタイプとして適当に設計した語彙より拡張性と十分性において信頼に足る

    • 実際、Googleのカスタムオプションのほうが表現できる幅は広い
  • 似たようなスキーマがいくつもあるとユーザーとっては不便であるから統一した方が良い。

    • Googleの既存資産を変更させて統一するよりは、こっちのプロトタイプ段階のgatewayを変更した方が早く確実に統一できる。

なお、古い独自オプションのサポートはバッサリ切り捨てた。

それから、HTTP Request pathのテンプレートの文法もちょっと複雑になって従来の goji のルーティング設定に頼る方式では限界が来たので、 独自にtemplate parserと実行時にマッチするためのスタックマシンを書いた。 ASTそのままでInterpreterパターンすれば十分かとも思ったのだが、よく考えたらparseするのはgatewayのコードを生成するときで、パターン照合が走るのはgatewayのコードが実行される時だ。 よってparse結果を何らかの形でgatewayソースコードとして保存しなければならないのだが、ASTを表すGoの式を生成しつつ将来の拡張もできる符号化とかも考えると面倒になってきたので スタックマシンのopcodeとして符号化することにしてしまった。 Railsの経験からもルーティングはボトルネックになりがちなので、この意味でもASTを再帰的に辿るよりはopcodeでloop + switchのほうが良いかもしれぬ。

gRPC-JSON proxy

grpc-gateway という gRPC からJSON APIへの変換プロキシ生成機を書いた。

これを使えばシステム内部ののmicroservicesはgRPCで通信しつつ公開APIJSON APIで提供する、みたいなことが簡単になる。

なお、gRPCそのものについては mattnさんの記事 が参考になる。

背景

gRPCの良い点はいくつもある。

  • データはデフォルトでprotocol buffersで直列化される。ベストではないにせよ十分にコンパクト且つ高速だし、サイズで言えばJSONとは比べるべくもない。
  • 簡単に複数の言語でサーバーのテンプレートやクライアントを生成できる。通信の詳細はgRPCにまかせて開発者はサーバーロジックの実装に注力できる。
  • design by Googleという安心感。

gRPCの素晴らしさは認めるものの、一方では欠点もある。まず、クライアントライブラリの多くはCで書かれたバイナリ拡張を含む。

これはRuby界ではあまり歓迎されていないし、多くのユーザーにAPIを使ってもらうということを考えればどうしたってクライアントは利用言語ネイティブで書かれていた方が良い。

また、そもそもgRPCはまだそんなに普及していない。gRPCがサポートしていない言語だってなくはない。

だからコントロールの効く範囲のシステム内部の通信にgRPCを使うのは極めて妥当な選択だが、現時点で公開APIをgRPCだけで提供するっていう決断はAPI提供者としてはなかなか勇気が要る。

だったら公開APIJSONのままでいきたいというのは自然な発想だ。

gRPCのJSONリアライゼーション機能を使っても良いのだけど、それでもHTTP 2.0必須だし、呼び出しパスもちょっと独特なのでちょっとまだ敷居が高い。

そこで、コモディティとしての従来型のRESTful JSON API over HTTP 1.xがやっぱり必要なわけだ。grpc-gatewayはgRPCで書いたサービスを簡単にそうしたRESTful JSON APIに変換してくれる。

実装

grpc-gatewayはgRPCそのものと同じく、protoc (protocol buffers compiler)のプラグインとして実装されている。

gRPCサービスを定義してある.protoファイルに専用のカスタムオプションでちょっとだけ情報を足すと、protoc-gen-grpc-gatewayプラグインがgRPCとJSON APIを仲立ちするreverse proxyを生成してくれるようになる。

カスタムオプションには次のような情報を指定できる

  • path: このメソッド呼び出しをマッピングするHTTP requestのpath
  • method: 同じくHTTP method
  • description: 備考

生成されるproxyはgolangだが、バックエンドのgRPCサービスとはgRPCで通信さえ出来れば良い。よってgRPCサービスのほうは普段通り好きな言語で書けば良い。

現時点ではgRPCのstreaming機能はサポートしていないが、これはすぐにサポートする予定だ。サポートした

そのほかにもREADME.mdに書いてあるようないくつかの機能をサポートしていきたいと思っている。

中でもSwagger API definitionの出力は是非対応したいポイントだ。protoからAPI definitionは作るからあとはJSON API clientはswaggerで勝手に作れ、という風にしたい。

Managed VMsに移行

今までこのblogはVPS上で動作させてきたが、この度 Managed VMs に移行した。 Wiki全文検索は一時的に利用不能になっているが、他はそのまま動作しているはずだ。

主な動機はいまどき個人blogのためだけにシステムを管理するのは厭ということである。 慣れているのと安いのでManaged VMsにしたが、システムをDockerizeしてあるので、必要であれば少しの手間でElastic Beanstalkでもどこでも移動できる。

難点としては、このblogにはVMがオーバースペックということだ。Managed VMs(elastic beanstalkも同じだった筈だが)はdockerコンテナとそれを走らせるVMを1:1にmapするので、この程度の負荷だとリソースが余ってしまう。複数のコンテナ(モジュール)でシステムを構成しようとするとVMの利用料がかなり無駄である。本当はN:Mにマップして5個ぐらいに分割したモジュールを2個ぐらいのVMで走らせたいんだけど。

そのへんの柔軟性についてはKubernetesを使いたかったが今回は諦めた。 というのは、Kubernetesクラスタを走らせたままKubernetes管理daemonをバージョンアップする仕組みがまだできていないので、本業ならともかく片手間に管理するにはミドルウェアの更新コストが高いためだ。 いちいちクラスタをもう一個立ち上げて、システムをre-deployしてDNSを更新して古いやつを消すのは面倒すぎる。 この問題( kubernetes#6075 )もいずれは解決するであろうから、そのときは Google Container Engine に再度移行するだろう。

言語処理100本ノックを敢えてRubyで (3)

引き続き、 言語処理100本ノック を敢えてRubyで解いている。

第3章は正規表現がテーマだが、正規表現はそこまで得意ではないので辛い。マッチの効率とか深く考えていない。

20. JSONデータの読み込み

require 'json'
uk = File.foreach("jawiki-country.json").
  map(&JSON.method(:parse)).
  find {|article| article['title'] == 'イギリス' }
raise "no article about イギリス" unless uk
puts uk['text']

感覚的なものだけど、この場合は &obj.method(:mid) 形式の簡潔さが見慣れない分のデメリットを上回る気がした。

21. カテゴリ名を含む行を抽出

File.foreach('uk.txt').grep(/\[\[Category:/) do |line|
  puts line
end

この辺はRubyのほうがPythonよりsedawkの影響が色濃く残っていて簡潔に書けるかなぁ。

22. カテゴリ名の抽出

pattern = /
  \[\[
    Category:
    ([^|\]]+)
    (?:\|[^\]]*)?
  \]\]
/x
File.read("uk.txt").scan(pattern) do |cat,|
  puts cat
end

正規表現がとても読みづらくなったのでせめて x オプションで複数行に分けてみた。

23. セクション構造

File.foreach("uk.txt") do |line|
  next unless m = /^(={2,})\s*([^=]+)\s*\1/o.match(line)
  puts "level=#{m[1].size - 1}, name=#{m[2]}"
end

24. ファイル参照の抽出

pattern = /
  \[\[
    File:
    ([^|\]]+)
    (?:\|[^\]]*)*
  \]\]
/x
File.read("uk.txt").scan(pattern) do |cat,|
  puts cat
end

Categoryの場合とほとんど変わらないと思うんだが、出題意図を読み違えてないよね?

25. テンプレートの抽出

def params
  templatePattern = /
    {{基礎情報\s+\s+
      (?<params>
        (?<markup>
          {{\g<markup>}} |
          [^{}]*
        )*
      )
    }}
  /x

  article = File.read("uk.txt")
  raise "no 基礎情報 found" unless m = templatePattern.match(article)
  base = m[:params]

  Hash.new.tap {|result|
    base.split(/^\|/).each do |entry|
      next if entry.empty?
      name, value = entry.split(/\s*=\s*/, 2)
      result[name] = value.chomp
    end
  }
end

if $0 == __FILE__
  p params
end

String#scanで切り出すのとnamed captureはあまり相性が良くないことが判明。 最初に基礎情報を取り出す部分は田中哲スペシャルのおかげで簡潔に再帰構造をサポートできている。

一方、テンプレートパラメータの抽出はMediaWikiの文法を正確に表してはいない。だが、今回はパラメータ区切りは常に行頭から始まるのでとりあえず十分である。

26. 強調マークアップの除去

require_relative '25.rb'

def params2
  Hash.new.tap {|result|
    params.each do |name, value|
      result[name] = value.gsub(/('{2,3}|'{5})([^']+)\1/, '\2')
    end
  }
end

if $0 == __FILE__
  p params2
end

27. 内部リンクの除去

require_relative '26.rb'

def params3
  Hash.new.tap {|result|
    params2.each do |name, value|
      result[name] = value.gsub(/\[\[ ([^\|\]:]+) (?:\|([^\]]+))? \]\]/x) do
        $2 || $1
      end
    end
  }
end

if $0 == __FILE__
  p params3
end

28. MediaWikiマークアップの除去

require_relative '27.rb'

def params4
  Hash.new.tap {|result|
    params3.each do |name, value|
      value = value.gsub(/{{([^\|}]+)(?:\|([^\|}]+)?)*}}/) { $2 || $1 }
      value = value.gsub(%r!<ref(?:\s[^/>]+)?>.*?</ref>!m, '')
      value = value.gsub(%r!<ref(?:\s[^/>]+)?/>!, '')
      value = value.gsub(%r!<[[:alpha:]]+\s*/>!, '')
      value = value.gsub(%r!&pound;!, '£')
      result[name] = value
    end
  }
end

if $0 == __FILE__
  p params4
end

MediaWiki記法は結構いろいろあるのでやり出すとキリが無い。とりあえずこんな感じだろうか。 遊びでやるにはそろそろ辛くなってきた。

実務でやるなら、目的を満たす程度のminimalなMediaWiki parserを書いてちゃんとunit testを書くべきだろう。

29. 国旗画像のURLを取得する

require 'json'
require 'open-uri'
require_relative '28.rb'

name = params4['国旗画像']
url = "http://ja.wikipedia.org/w/api.php?format=json&action=query&continue=&titles=Image:%s&prop=imageinfo&iiprop=url" % URI.escape(name)
result = JSON.parse(open(url) {|f| f.read })
puts result['query']['pages']['-1']['imageinfo'].first['url']

むぅ。MediaWiki APIってのがあるのか。

言語処理100本ノックを敢えてRubyで (2)

10. 行数のカウント

p $<.count

確認

wc hightemp.txt

$< の仕様はまさにこういう処理を書くために考えられている。 が、今回に関しては普通ならわざわざ書かずにwcを使う。

11. タブをスペースに置換

$<.each_line do |line|
  puts line.gsub("\t", ' ')
end

確認

sed "s/^I/ /g" hightemp.txt

12. 1列目をcol1.txtに,2列目をcol2.txtに保存

File.open("col1.txt", "w") {|f1|
  File.open("col2.txt", "w") {|f2|
    $<.each_line do |line|
      cols = line.split("\t")
      f1.puts cols[0]
      f2.puts cols[1]
    end
  }
}

確認

cut -f1 hightemp.txt
cut -f2 hightemp.txt

普通で面白くない。 今回はデータが小さいことが分かっているので、オンメモリに構築してから File::write で書いた方がインデントは少なくなって綺麗だろう。 複数のファイルを同じ寿命で開くことはままあるので、複数まとめて開いてまとめて閉じるラッパーメソッドを書いたことはある。

こうしてみるとgolangdefer がちょとうらやましいなぁ。 Object.instance_eval で似たようなのを構築するのは易しいが、 self がすり替わってしまうし完全ではない。

13. col1.txtとcol2.txtをマージ

File.open("col1.txt") {|f1|
  File.open("col2.txt") {|f2|
    f1.zip(f2).each do |col1, col2|
      puts "#{col1.chomp}\t#{col2}"
    end
  }
}

性能的に見ると Enumerable.zipArray を返すのでメモリを食ってよろしくない。今回はデータが小さいから良いものの、 lazy を使っても全般的にRubyはこの手の処理が苦手である。 この辺の失敗体験がStreemにつながっているんだろうか。

paste col1.txt col2.txt

14. 先頭からN行を出力

n = ARGV.shift.to_i
$<.each_with_index do |line, i|
  break if i >= n
  puts line
end

別解。こちらのほうが今風だ。

n = ARGV.shift.to_i
$<.lazy.take(n).each{|line| puts line }

確認

head -10 hightemp.txt

15. 末尾のN行を出力

class Ring
  include Enumerable
  ABSENT = Object.new.freeze
  def initialize(n)
    @buf = Array.new(n, ABSENT)
    @pos = 0
  end

  def add(item)
    @buf[@pos] = item
    @pos += 1
    @pos %= @buf.size
  end

  def each
    (0...@buf.size).each do |i|
      item = @buf[(i + @pos) % @buf.size]
      next if item == ABSENT
      yield item
    end
  end
end

n = ARGV.shift.to_i
ring = Ring.new(n)
$<.each(&ring.method(:add))
ring.each do |line|
  puts line
end

まじめに後方からバッファリングしつつEOLを探索すると面倒いので先頭からなめた。 tail (1)の実装は結構うまくできていて、まねしようとするとそれなりに難しい。

あと、 &obj.method(:mid) は見慣れない割には簡潔でないので実務では避けるべき。

Ring もあまりまじめな実装ではない。

そういえば、Ring bufferが標準ライブラリに入っていて気軽に使えると割と便利なことがgolangの経験で分かった。 しかし、今からコンテナをRubyの標準添付ライブラリに足す線はなかなか無いだろうなぁ。

tail -10 hightemp.txt

16. ファイルをN分割する

n = ARGV.shift.to_i
lines = $<.to_a
per_chunk = if lines.size % n == 0
              lines.size / n
            else
              lines.size / n + 1
            end

suffix = 'aa'
lines.each_slice(per_chunk) do |chunk|
  File.open("x#{suffix}", "w") {|f|
    chunk.each do |line|
      f.puts line
    end
  }
  suffix.succ!
end

出力ファイル名は split (1)のデフォルトに合わせた。

split (1)で実現せよ」という設問については、BSDsplit には -n が無いから難しいんだが。

gsplit -n 5 hightemp.txt

17. 1列目の文字列の異なり

puts $<.map {|line| line.split("\t")[0] }.uniq

確認

cut -f1 hightemp.txt | sort | uniq

18. 各行を3コラム目の数値の降順にソート

$<.map {|line| line.split("\t") }.sort_by {|_, _, temp, _|
  -temp.to_f
}.each do |data|
  puts data.join("\t")
end

確認

sort -rnk3 hightemp.txt

19. 各行の1コラム目の文字列の出現頻度を求め,出現頻度の高い順に並べる

freq = Hash.new(0)
$<.map {|line|
  pref, *rest = line.split("\t")
  freq[pref] += 1
  [pref, *rest]
}.sort_by {|pref,| [-freq[pref], pref] }.each do |data|
  puts data.join("\t")
end

同じ出現頻度が多くて分かりづらい。あと、都道府県でグルーピングもしてみた。

shellコマンドでの確認指示については、こういう意図かなぁ?

cut -f1 hightemp.txt | sort | uniq -c | sort -rnk1 -t' '